
style="text-align: center;">


style="text-align: center;">
style="text-align: center;">

style="text-align: center;">

style="text-align: center;">

Warning: Undefined array key "type_setup" in /home/public/includes/nav.php on line 49
Set Up Dvorak |
Warning: Undefined array key "type_tutors" in /home/public/includes/nav.php on line 51
DV Typing Tutors |  DV Keyboards |
Warning: Undefined array key "type_downloads" in /home/public/includes/nav.php on line 55
Downloads
DV Keyboards
OPTION 1: Hardware
Does it feel like you've made a life-long decision to switch to Dvorak? It might be worth it to invest in a hard-wired Dvorak Keyboard! Here are a few places that offer custom made Dvorak Keyboards:
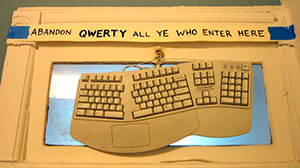
Frunch's old Dvorak Keyboard hanging in GCB and Alec's apartment, above the computer room door. Brooklyn, NY circa 2008
OPTION 2: Cover Up QWERTY!
The easiest way to convert your keyboard to Dvorak is to cover the keys with stickers!
We have a vinyl sticker (with instructions!) availble for $3 over at our Dvorak Zine CafePres store, or if you have a piece of self-adhesive printer paper you can print out your own sticker! It might not last as long as the vinyl one, but it'll at least get you typing Dvorak! And it's FREE!
Whichever option you choose, just cut out the letters and symbols and then stick them to your keyboard keys. Voila! Instant Dvorak keyboard. TIP: Some users have found that the stickers will last longer if you "laminate" them with a piece of clear tape.
DVORAK KEY MAP STICKER!
Vinyl $3.00@ CafePress.com
FREE! Self-Adhesive
PDF Print Out
OPTION 3: Reconfigure Your Keyboard
For those of you who are a little more hands-on, we have step-by-step instructions on how to safely rip the keys off of your keyboard and then reconfigure them into the Dvorak Keyboard Layout. We (Alec, GCB and Frunch) have all done this with our iMac, iBook and MacBook keyboards, but we also know from other people's experiences that it CAN NOT be done on ALL keyboards! So, PLEASE NOTE that you could permanently damage your keyboard by attempting this! YOU HAVE BEEN WARNED! Follow the instructions below AT YOUR OWN RISK! We are not responsible for replacing your broken keyboard!
You can also check out this instructable for convertining a Macbook keyboard to Dvorak
ALSO: Many keyboards will allow you to switch all of the keys except for one or two special keys with little plastic guides. People have written to us saying they can make these keys work by removing the guides with a dremmel or similar tool. AGAIN, try this at your own risk!
THESE MIGHT WORK:
- old Apple keyboards
(see below) - iBook laptop
- TDE Systems Keyboards
- Technika Keyboards
- Logitech Internet Navigator Keyboard
- Ipex ps/2 Keyboards
- Nexxtech Keyboards
- All IBM model M Keyboards
THESE WON'T:
- Viao laptop
- Dell Inspiron laptop
- Labtec Keyboards
- Toshiba Keyboards
- Logitech Cordless Keyboard
- Asus eee PC 700 series
- Micro$oft Natural Keyboards
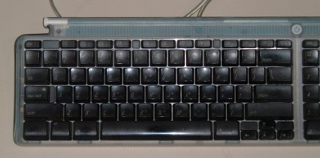
Step 1: Preparations
Here we have a standard USB iMac keyboard. The iMac keyboard is particularly good for Dvorak-ification (yeah, Apple!) because its keys are all exactly the same height. Thus, when you alter the arrangement of the keys to the Dvorak layout, you don't get the "lumpiness" that can occur on a "molded" keyboard.
Before you start modifying your keyboard, disconnect it from your machine. Not only will this prevent the highly improbable outcome of being electrocuted by your keyboard, but it will also keep you from typing something along the lines of "q qqqqqqqq wwwwww eeeee..." as you put your keys back in one by one. Before we start, you will also need a flat-head screwdriver with a relatively thin head.
So.... go ahead. Go get a screwdriver out of your toolchest. We'll be here when you get back. If you've already got a Leatherman or CyberTool ready on your belt -- RAD! You get extra geek points.
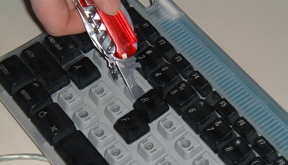
Step 2: Pulling off the keys
Not only is the iMac keyboard non-lumpy in the Dvorak layout, but it also has extremely easy-to-remove keys. To remove the keys from the keyboard, simply shove your screwdriver in between the keys and push the screwdriver to the side. (NOTE: It might be easier to put the screwdriver under the TOP edge of the keys if you are modifying your LAPTOP) You might want to have a bowl or some other form of storage perephanelia around, so that you have somewhere to put the keys while they're out. Proceed to Step 3 to see what the keyboard should look like when you're done removing keys.
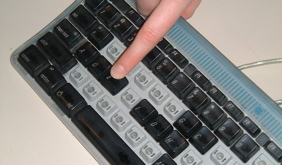
Step 3: Ready to re-arrange the keys
This is what your keyboard should look like when you've removed all the keys that differ. Note that the A and M keys stay in the same place, which brings us to an interesting piece of Dvorak trivia: "am" is one of the few English words that types the same in both QWERTY and Dvorak. So, if you spend all day typing "am" over and over again, we apologize ... Dvorak won't increase your typing performance at all! ;)

Step 4: Replacing the keys
To put the keys back in their new arrangement, simply put the key you want on the correct place on the keyboard, and push straight down! For help with putting keys in the correct places, simply click here for an image of the Dvorak layout.
Step 5: Setting up your computer
You're all done now! Congratulations! Well, actually that's a lie. If you plug your keyboard back into your computer, you'll find that when you type, your keyboard still type in QWERTY mode. (To test this, type the home row. You should still get ASDFGHJKL;) In order to get your computer to fully support Dvorak, you must also set up your software to do the "translation" Click here to go back to the instructions for Mac, Windows, and Linux machines. To test that your new Dvorak layout is working, type the homerow on your keyboard again. This time, you should get AOEUIDHTNS- After that, all you have to do is have fun typing Dvorak!

